I usually enjoy a DIY challenge but in one area in particular it’ll send both Jens and I running for the hills. Any guesses?? No. You’re just going to give up like that so quickly… okay I’ll tell you anyways. I hate plumbing! Especially when it involves trying to fix a plumbing problem (i.e. clogged drains, leaky pipes) because we rarely find ourselves successful on the first attempt and it’s frustrating and costly to call in the pros.
Why the sudden rant about plumbing? Last night while attempting to start a load of laundry I stumbled upon our utility sink full of nasty, greasy water. I closed my eyes, clicked my heels together three times and then reopened my eyes hoping I was just hallucinating. (Okay not really but it makes for a better story). So I pulled up my big girl pants and reached my ungloved hand into the nasty cesspool to check the sink drain for an obstruction but unfortunately there wasn’t one and this was going to be a bigger fix than that so I called in the big guns which went something like this …. “ummm, Jens I think we have a problem with the drain on the utility sink”
A trip to Ace Hardware for a drain snake, plunger , and Drano later and Jens got to work doing one of the most dreaded home maintenance jobs ever…. snaking a clogged drain. Needless to say, he didn’t have much success but after a couple hours he did manage to completely get himself covered in nastiness and destroyed a couple old towels mopping up the mess on the concrete floor. So we cut bait and called in the pros… Roto-Rooter should be visiting our casa between the hours of 6-8pm this evening to hopefully resolve our plumbing issue. Our wallets may be feeling a little lighter after tonight, but hopefully so will our pile of laundry.

Thursday, February 17, 2011
Wednesday, February 9, 2011
Installing Stone Veneer
Alright, as promised - some more recent (Fall 2010) photos of the project that never ends and a quick little how-to on installing the stone veneer around our fireplace.
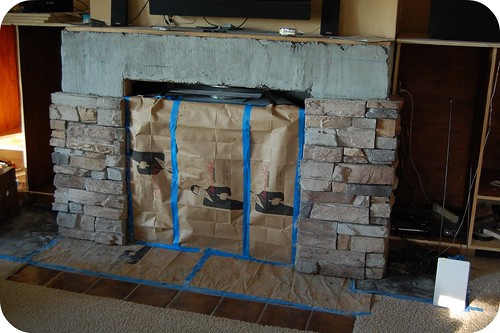
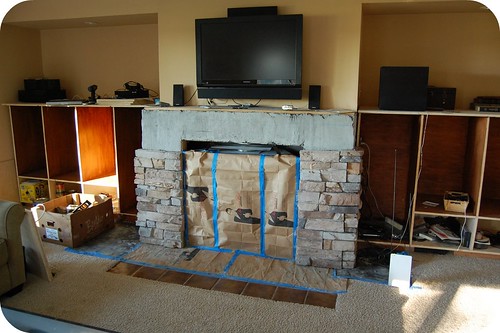
Here are the pictures showing the stone about 80% complete (we thought we’d have enough stone but didn’t so had to order some more and finished it the following weekend). Please ignore the chaos going on in the ‘cabinets’ – they became our temporary tool storage area, but now Ivan’s mobile and getting into everything so we’ve put most of the tools away in their proper home in the garage.
The whole process wasn’t too difficult – if you’ve installed tile, you can probably handle stone veneer. The first step was to prepare the surface for the stone which involved a layer of roofing felt (free from my father-in-law), wire lath (from local stone supplier), and a scratch coat. The roofing felt went onto the drywall easily with the staple gun making sure to overlap the seams. The wire lath was then installed - again using the staple gun and trying to make sure it goes on flat and tight around the corners. We used tin snips to cut it to size and I would recommend leather gloves because the edges are pretty sharp.
The most difficult part was then installing the scratch coat (mortar mix) over the wire lath but once we got the mortar mix to correct consistency my handy hubby was able to muscle it into and over the wire lath with a flat trowel. Oh and I almost forgot, as you can see in the pictures we covered up and taped off the flooring and the fireplace really well before we started with the mortar which I highly recommend because it can turn into a messy job. Once the mortar had set up a little bit we just lightly brushed it with a bristled brush to give it some texture – hence the name scratch coat.
Once all the prep work was done then came the fun part – actually installing the stone. We did a dry layout of a couple courses of stone so we could kinda get familiar with the pattern and what looked good. Then we cut the stone down to size where required with a tile cutter (borrowed from our awesome neighbors). We also had Jens’ cousin helping us out during this part – he was the designated mortar mixer. I was placing the laying out, buttering the back of, and placing the stone, and Jens was cutting the stone. With our three person system the actual stone installation went pretty quick and the pattern is groutless so once the stone was installed we were done (if only we had gotten enough stone to finish it that day…opps)
Next post I’ll update on how our cabinets are coming along which is what we’ve been working on most recently this Jan/Feb (thanks to another awesome neighbor who has borrowed us a heater for our woodshop a.k.a. two car garage).
Monday, February 7, 2011
The Project That Never Ends
In December 2009, Jens and I began a project and ……… it’s not done yet.
In our defense, it is a BIG project and it was interrupted in March 2010 by an important life changing event – the birth of our son, Ivan.

But, the now we are back at it full steam ahead and we are determined to complete the project in early 2011. Here’s the background story:
It all started one evening when Jens and I got the itch to start another project while that we had been discussing since buying the house, so before we knew it we had the hammers and crow bars out and we began to tear down the awful faux wood paneling along a big wall in our family room. Here’s what it looked like before that night.
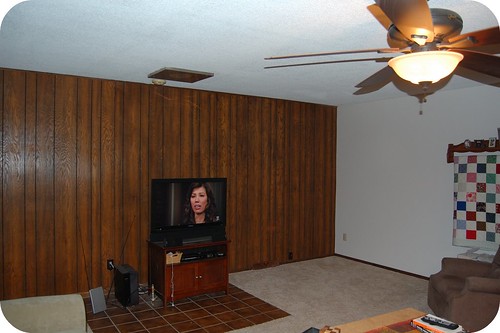
And here’s the wall once we were done tearing out the paneling. Ahhhh . Goodbye faux wood paneling!

In case you’re curious, the room used to house a freestanding gas fireplace which vented out the ceiling through the roof which explains the odd looking placement of tile in the middle of the room and the vent cover in the ceiling. When we purchased the house in May 2008 as a foreclosure, all of the appliances, including the fireplace, had been removed but it was otherwise intact. Unfortunately, our family room was freezing during the winter months due to inadequate venting to this room which was a later addition to the house, so we desperately needed another heat source to make this room habitable during a Minnesota winter. Enter a new high efficiency Kozy Heat® Fireplace!
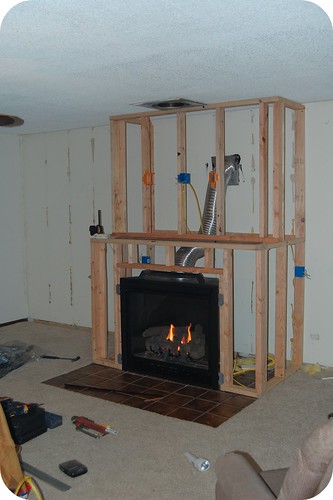
The gas line was already there, but it required a little upgrading since both the dryer and the fireplace came from the same manifold pipe and we needed some additional shut off valves to get things up to code. Once that was complete we framed out a ‘bump-out’ to install the fireplace in according to the clearance dimensions required on the manufacturer’s installation drawings. We also planned on mounting our TV above the fireplace so we ran some electrical boxes with the help of an electrician friend. Here it is all framed out.
Then came the drywalling, taping, mudding, sanding, more mudding/sanding, and then finally painting. It was starting to come together-but there was a long way to go yet! After the holiday’s we got to work again and made plans for the built-in cabinets which were to flank each side of the fireplace. We used ¾” thick birch veneer plywood to build the carcasses of the cabinets, which Jens was able to whip together using rabbet and dado construction.
...And then in Spring 2010 Ivan was born so everything went on pause for awhile.
We picked the project back up for a little while this past fall and covered the fireplace surround with stone veneer from Boulder Creek. We used a pattern called Western Ledgestak in Appoloosa which I was able to find from Craigslist! (Does anybody else do a little happy dance when they find cheap construction materials on craigslist? I'll be the first to fess up.) It was almost enough for our entire project for just $50 ($300 if we ordered it from our local supplier). We ended up needing to order one additional box, but we still came out way ahead cost wise. And we are really happy with the way it looks and how forgiving it was to work with (i.e. little mistakes aren't noticable due to the natural irregularity of the "stone")
So now we are nearing Ivan's first birthday and it's time to officially get this project completed (especially since he's mobile now and we should probably get our tools out of the family room). Some current status and progress pictures to come shortly.....
In our defense, it is a BIG project and it was interrupted in March 2010 by an important life changing event – the birth of our son, Ivan.
But, the now we are back at it full steam ahead and we are determined to complete the project in early 2011. Here’s the background story:
It all started one evening when Jens and I got the itch to start another project while that we had been discussing since buying the house, so before we knew it we had the hammers and crow bars out and we began to tear down the awful faux wood paneling along a big wall in our family room. Here’s what it looked like before that night.
And here’s the wall once we were done tearing out the paneling. Ahhhh . Goodbye faux wood paneling!
In case you’re curious, the room used to house a freestanding gas fireplace which vented out the ceiling through the roof which explains the odd looking placement of tile in the middle of the room and the vent cover in the ceiling. When we purchased the house in May 2008 as a foreclosure, all of the appliances, including the fireplace, had been removed but it was otherwise intact. Unfortunately, our family room was freezing during the winter months due to inadequate venting to this room which was a later addition to the house, so we desperately needed another heat source to make this room habitable during a Minnesota winter. Enter a new high efficiency Kozy Heat® Fireplace!
The gas line was already there, but it required a little upgrading since both the dryer and the fireplace came from the same manifold pipe and we needed some additional shut off valves to get things up to code. Once that was complete we framed out a ‘bump-out’ to install the fireplace in according to the clearance dimensions required on the manufacturer’s installation drawings. We also planned on mounting our TV above the fireplace so we ran some electrical boxes with the help of an electrician friend. Here it is all framed out.
Then came the drywalling, taping, mudding, sanding, more mudding/sanding, and then finally painting. It was starting to come together-but there was a long way to go yet! After the holiday’s we got to work again and made plans for the built-in cabinets which were to flank each side of the fireplace. We used ¾” thick birch veneer plywood to build the carcasses of the cabinets, which Jens was able to whip together using rabbet and dado construction.
...And then in Spring 2010 Ivan was born so everything went on pause for awhile.
We picked the project back up for a little while this past fall and covered the fireplace surround with stone veneer from Boulder Creek. We used a pattern called Western Ledgestak in Appoloosa which I was able to find from Craigslist! (Does anybody else do a little happy dance when they find cheap construction materials on craigslist? I'll be the first to fess up.) It was almost enough for our entire project for just $50 ($300 if we ordered it from our local supplier). We ended up needing to order one additional box, but we still came out way ahead cost wise. And we are really happy with the way it looks and how forgiving it was to work with (i.e. little mistakes aren't noticable due to the natural irregularity of the "stone")
So now we are nearing Ivan's first birthday and it's time to officially get this project completed (especially since he's mobile now and we should probably get our tools out of the family room). Some current status and progress pictures to come shortly.....
Subscribe to:
Comments (Atom)