
In our defense, it is a BIG project and it was interrupted in March 2010 by an important life changing event – the birth of our son, Ivan.
But, the now we are back at it full steam ahead and we are determined to complete the project in early 2011. Here’s the background story:
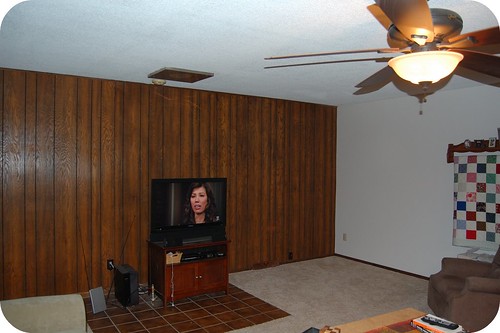
It all started one evening when Jens and I got the itch to start another project while that we had been discussing since buying the house, so before we knew it we had the hammers and crow bars out and we began to tear down the awful faux wood paneling along a big wall in our family room. Here’s what it looked like before that night.
And here’s the wall once we were done tearing out the paneling. Ahhhh . Goodbye faux wood paneling!

In case you’re curious, the room used to house a freestanding gas fireplace which vented out the ceiling through the roof which explains the odd looking placement of tile in the middle of the room and the vent cover in the ceiling. When we purchased the house in May 2008 as a foreclosure, all of the appliances, including the fireplace, had been removed but it was otherwise intact. Unfortunately, our family room was freezing during the winter months due to inadequate venting to this room which was a later addition to the house, so we desperately needed another heat source to make this room habitable during a Minnesota winter. Enter a new high efficiency Kozy Heat® Fireplace!
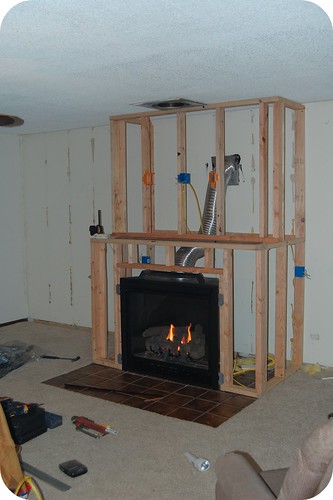
The gas line was already there, but it required a little upgrading since both the dryer and the fireplace came from the same manifold pipe and we needed some additional shut off valves to get things up to code. Once that was complete we framed out a ‘bump-out’ to install the fireplace in according to the clearance dimensions required on the manufacturer’s installation drawings. We also planned on mounting our TV above the fireplace so we ran some electrical boxes with the help of an electrician friend. Here it is all framed out.
Then came the drywalling, taping, mudding, sanding, more mudding/sanding, and then finally painting. It was starting to come together-but there was a long way to go yet! After the holiday’s we got to work again and made plans for the built-in cabinets which were to flank each side of the fireplace. We used ¾” thick birch veneer plywood to build the carcasses of the cabinets, which Jens was able to whip together using rabbet and dado construction.
...And then in Spring 2010 Ivan was born so everything went on pause for awhile.
We picked the project back up for a little while this past fall and covered the fireplace surround with stone veneer from Boulder Creek. We used a pattern called Western Ledgestak in Appoloosa which I was able to find from Craigslist! (Does anybody else do a little happy dance when they find cheap construction materials on craigslist? I'll be the first to fess up.) It was almost enough for our entire project for just $50 ($300 if we ordered it from our local supplier). We ended up needing to order one additional box, but we still came out way ahead cost wise. And we are really happy with the way it looks and how forgiving it was to work with (i.e. little mistakes aren't noticable due to the natural irregularity of the "stone")
So now we are nearing Ivan's first birthday and it's time to officially get this project completed (especially since he's mobile now and we should probably get our tools out of the family room). Some current status and progress pictures to come shortly.....
No comments:
Post a Comment