Wednesday, April 27, 2011

April Showers….

…bring wet basements. Yes, I know they are supposed to bring May flowers, but this spring the frequent rainy weather we’ve been experiencing and the prior melting of a record amount of snow has lead to a reoccurring wet spot in our basement whenever we get heavy rains. And guess what … so far it has rained about everyday this week, and Jens is gone so that leaves me here to try to deal with it by my lonesome.

Nobody likes a wet basement, but it’s even worse when it occurs in a finished part of the basement which is carpeted and dry-walled. The first it occurred we thought it was due to our sump pump not operating correctly, but we’ve now replaced it and it’s operating just fine and water is freely flowing into the sump from our drain tile.

It appears to be a localized issue as only one spot continues to get wet when it rains and it appears wettest next to the exterior wall. So now we are back to diagnosing the issue which unfortunately will likely mean tearing out some drywall to investigate our block foundation for a crack. Honey if you’re reading this, now might be a good time to buy me a dremel multitool for Mother’s Day (hint, hint). Hopefully what we uncover is not too ugly!

Oh and as for the May flowers, the daffodil bulbs I planted last fall have finally started blooming this week so although it’s not technically May I’ll take them over the April showers anytime.

Tuesday, March 29, 2011

The Magical Mythical Spinny Thing

To start I got a new tool.  Specifically a very complicated tool holding device.  This specific tool holder will allow us to do a wide variety of here to for unaccomplishable projects with a modicum of success rivaling people who do this for a living! (applause breaks out, angels sing, light shines from the heavens).  Lay-mans terms; We built a router table.


A table, yep, a table.  You have to understand the significance behind what a router table represents.  I can now pass different and various species of wood over, next too, around, near and at specific set distances from 1/2" shank razor sharp shaping bits that spin at 16,000rpms. Excuse me while I breathe lecherously into a paper bag.  Im that excited. 

Router tables, good free standing shop equipment router tables, not  "bench top" models (typically suited for doll houses , bird houses, and other such dwellings that people, real people are not ever supposed to inhabit) can easily put you back 500+ dollars, easy.  Well, we needed a router table and at that price point i damn near choked on mouth full of my favorite premium beverage (Premium, really that's what its called, and its well, premium, sorry for the side bar, but its awesome).  Becky and I began scouring Craigslist in an effort to upgrade my previously purchased bench top router table (craigslist).  What we found was not encouraging everything was either hyper expensive or simply under-suited to what we needed.  We did eventually find a brand new BenchDog router table top for 100 bucks, GREAT DEAL, had the insert every thing we needed, except for the table, the dust collection, the fence etc. etc.  We had work to do.


It started with the concept.  I took my design cues for the table from things id seen on the internet and quite frankly pics of ocean going oil drilling platforms.

Once we had the 4x4's in place and secured by the 2x4 frame, we could put the skirt/actual table support on.  Now building the router table from scratch was no easy feat, we had to lay out, mark and precisely drill all of the holes for the T-nuts with a hand held drill and speed square. This was not fun nor was it quick but, we took our time and i was pretty happy with result.


Once the base was built, the skirt and router table were connected It was relatively simple to join the two parts.  WA-LA Router table, and i was freaking pumped (YEAH BABY) .  We weren't done yet, there was still the issue of the fence and the dust collection system. 

The fence was, well, I'm a bit ashamed to admit this, the fence is from IKEA.  Thats right, on my wife's birthday after a 4 dollar meal of Swedish meatballs we hit up the reject station at IKEA and found what would eventually turn into a bad ass router table fence. 


There it is in all its $8.00 baby blue glory.  It was a pretty simple matter to cut the parallel tracks for the
Router table tracks and insert some pre-made extruded aluminum tracking and screw downs after i made the fence and sled.  I included a port on the back that works really really well to attach my shop vac and, i had it.  The table we built has the features of an 800.00 table at any store that would sell them, were into this table maybe 150.00 total. Its great it really is. 


Next ill show you what we did with it once we built it. 

And now a picture of my Dog.  For No Reason At All. 


Our Revamped Bathroom Vanity

March definitely hasn’t been a good month for blogging but it’s been productive. I finally finished revamping our bathroom vanity which I began writing about in this post back in January. And without further ado, here are the before and after shots.
It’s not perfect, but it’s a drastic improvement from the dated ugly box we started with. And believe it or not it’s still the same vanity that’s been upgraded with some base board , bead molding, paint, new hardware, and new doors constructed by my handy hubby.
Here are the steps we took to get from point A to B:
Step One is obvious - Remove the old doors and hardware. I also removed some 40 year old (probably original) contact paper from the inside and primed the whole inside of the cabinet.

Ste Two - Cut and install base board around the bottom of the cabinet. I used some big box store pre-primed base board. I cut miters for the corners with our compound miter saw, cut the other edges and curved radiuses with a coping saw, and then Jens saved me some time and cut the straight portion between the two “feet” with a straight cut bit in his router. I installed it with finish nails using a pneumatic nailer/stapler (aka nail gun).

Step Three - Become impatient with lack of progress on bead molding (see step 4), and decide to prime/paint the outside of the cabinet. I used gray latex primer and Gildden’s Onyx Black latex paint in a High Gloss. In an attempt to achieve less visible brush marks I also mixed in some Floetrol latex paint additive. It may have helped a little but there are still more brush marks than I’d like. If I had a do-over, I’d probably use an oil-based paint and go for an eggshell or semi-gloss finish - it flows a little better and shows fewer brush strokes . The high gloss finish tends to show every single brush stroke. To get the luxe glossy look I’d then use a clear vanish over the oil-based paint to protect it and give it some more shine.

Step Four – Cut and install bead molding. Using 3” width poplar from the big box store Jens used his router to put a bead profile on each edge of the poplar. He then cut the bead off (leaving a shoulder on the bead) by running the beaded boards through his table saw. This was good practice for our built-in cabinets we’re constructing around our fireplace which will be done in hard maple. Our take away lesson here is to make sure we are using wood stock that is the same thickness as the cabinet face frame to cut the bead molding from.  If you use different thickness’ the back edges don’t sit flush which can lead to hardware installation issues later. The other thing we’ll do different with our other cabinets is leave a smaller shoulder on the bead molding, just an aesthetic preference.

After Jens cut the bead molding on his table saw, I cut it to down to the correct length using the compound miter saw for a mitered joint in the corners. Admittedly, I wasn’t as precise here as I should have been since I knew I could caulk the gaps in the miters and the paint would hide any sloppy miter joints. It’s a good thing I now have some practice because this’ll have to be perfect on our stain grade maple cabinets. The bead was installed with some finish nails using the air gun. I LOVE the air gun! I get giddy when I get to use it so I forgot to sand the bead molding before installing so the wood was a little fuzzy but the two coats of paint I put over it helped hide it a bit.  


Step Five – Build the new doors. Using the leftover from the 3” poplar board that we cut the bead profile away from, Jens made cabinet door rails and stiles using his brand spanking new router table and a rail and stile router bit set. I’m not going to go into all the details, I’ll let Jens explain that complicated part in his own post some day for those of you who are into the hard-core woodworking stuff. For the panels of the door we used ¼” thick MDF. I then got the fun job of sanding the assembled doors and priming/painting them (See step 3).


Step Six  – Install doors and hardware. Besides picking out the correct hinges for an inset door, there’s not much to explain here. We used a more traditional looking hinge and pull in a modern brushed nickel finish to echo the new traditional form and modern finish of the cabinet. We also used some magnetic door catches for inset doors to help the doors stay closed. I installed the hinges on the cabinet first and then attached them to the doors, no mortising or trickery required just pre-drilling pilot holes once I got the positioning correct and securing everything with the provided screws. It was more art than science  attempting to even out the reveal around the doors and make sure everything was hanging approximately even. (I used playing cards as shims to help get the right spacing around the perimeter)

It’s far from perfect but I’m happy with it and since I’m happy with it Jens is happy with it. The wood, paint and hardware were relatively cheap in comparison to a new vanity and we got a lot of practice in cutting beading and making cabinet doors for the built-in cabinet project. Now we just need to wait for some warmer weather to tackle cutting and polishing the carrera marble for the top that I scored for $50 off of craigslist well over a year ago.

Tuesday, March 1, 2011

THE HORROR

Oh Happy Hell.

Crown Molding.

If you don't know what I'm talking about, look it up, you will find notation after notation detailing the frustrated results of broken crafts people resigning to a life of baking pre-mixed brownies vowing to never again touch a power tool in an effort to quell the ache of failed projects that rages inside their soul.

To those that have completed these projects with some modicum of success, I salute you, and I hope you can find solace in the bottom of your favorite bottle, and the arms of your nearest loved one, hopefully simultaneously.

In an effort to describe the sheer magnitude of this project I will detail the scope of what I was faced with.

6 cuts, a total of roughly 22 ft of crown molding.

If I'm honest this has been the most terrifying portion of a project I’ve done. Ever. Period.
I would rather install central HVAC, and high speed Internet lines in the Taj Mahal with a butter knife and a copy of "Pride and Prejudice" for reference than tackle crown molding. My reasons are as follows:

1) I'm going to be looking at this freaking trim every day, for as long as we own this house (hopefully a long long time - I like the house what can is say).

2) Due to the location of the trim, I will see EVERY SINGLE MISTAKE, there is NO hiding even the slightest Fu%k up. No way, wood putty would look stupid. Sloppy joints make even the most well crafted project look terrible.

3) Compound Angles. Perfect Miters are a total pain with POS equipment. A simple picture frame can come undone with a saw that has a hard time keeping tolerance. Take a crap saw, a neophyte carpenter and add not one but two angles PER cut, and that my friends is a recipe for having a project sit undone for years on end.

To catalog the project I will start with the material. We decided on a nice simple solid maple cove crown molding. It’s really nice, seriously, it adds the perfect cap to The Project That Never Ends. The only problem we had was that we picked it up from the local reuse center. Great right? Yeah, if you're sure you won’t scrap any. I knew I would scrap some, and there was not enough in the bundle to give me the margins I wanted. The scant margin of error coupled with my total lack of experience with crown molding made this project loom very large in my lexicon of terrifying tasks.

Once the material had been selected, I had to educate myself on cutting the abominable medium. I began by looking up all the things I could on my handy Internet machine, trying to discern the best possible way to complete this project. Every link, blog, tutorial, video, showed some sort of jig that my inner cheapskate/obstinate DIYer mentality forbade me from shelling out the coin for. I decided that I could do this with no additional tool purchase (moron).

Keep in mind that this crown molding would be covering up, a 40 year old square suspect wall (built by others) behind framing (built by me), behind dry wall (installed by me), and behind cement (applied by.......me). There is a term in manufacturing called "built up machine tolerance", apropos to machining precise machine parts that may all be within spec, but due to them all being at either the Min/Max of tolerance the end result is no longer within spec. This project showed a "built up moron builder tolerance", meaning that all those times I had checked for square and level amounted to, umm well, nothing. I was going to install this crown on a surface that was at best, square......ish. With a saw that could on its best day cut a 45......ish miter. Not fun.

It took me 5 hrs to make and install the three pieces of crown necessary to cover the top of the fire place. I am well aware of the fact that there are skilled crafts people (I am not one of those people - I know skill when I see it, and cannot replicate it on my best day) that could do this in a fraction of the time. It took me 5 hrs. Eat me.

The end result needs some tweaks. I think I can live with the result. If I can pass on any advice, if you ever contemplate doing solid maple crown molding in your project, and your next immediate thought isn’t "lets hire a pro", seek counseling. (Now that I’ve done it, I can say with no reservation, it sucked and it kicked my butt.) Happy cutting.

Thursday, February 17, 2011

Houston, we have a problem

I usually enjoy a DIY challenge but in one area in particular it’ll send both Jens and I running for the hills. Any guesses?? No. You’re just going to give up like that so quickly… okay I’ll tell you anyways. I hate plumbing! Especially when it involves trying to fix a plumbing problem (i.e. clogged drains, leaky pipes) because we rarely find ourselves successful on the first attempt and it’s frustrating and costly to call in the pros.

Why the sudden rant about plumbing? Last night while attempting to start a load of laundry I stumbled upon our utility sink full of nasty, greasy water. I closed my eyes, clicked my heels together three times and then reopened my eyes hoping I was just hallucinating. (Okay not really but it makes for a better story). So I pulled up my big girl pants and reached my ungloved hand into the nasty cesspool to check the sink drain for an obstruction but unfortunately there wasn’t one and this was going to be a bigger fix than that so I called in the big guns which went something like this …. “ummm, Jens I think we have a problem with the drain on the utility sink”

A trip to Ace Hardware for a drain snake, plunger , and Drano later and Jens got to work doing one of the most dreaded home maintenance jobs ever…. snaking a clogged drain. Needless to say, he didn’t have much success but after a couple hours he did manage to completely get himself covered in nastiness and destroyed a couple old towels mopping up the mess on the concrete floor. So we cut bait and called in the pros… Roto-Rooter should be visiting our casa between the hours of 6-8pm this evening to hopefully resolve our plumbing issue. Our wallets may be feeling a little lighter after tonight, but hopefully so will our pile of laundry.

Wednesday, February 9, 2011

Installing Stone Veneer

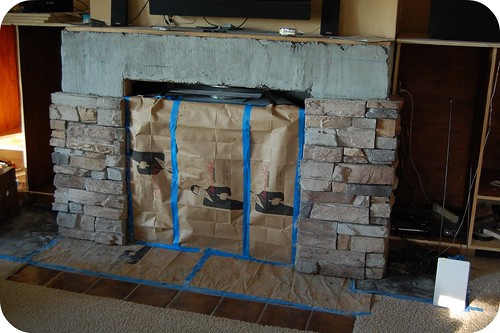
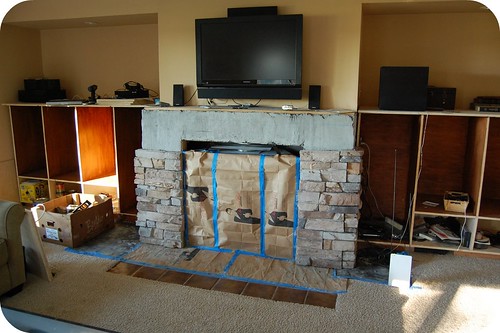
Alright, as promised - some more recent (Fall 2010) photos of the project that never ends and a quick little how-to on installing the stone veneer around our fireplace.

Here are the pictures showing the stone about 80% complete (we thought we’d have enough stone but didn’t so had to order some more and finished it the following weekend). Please ignore the chaos going on in the ‘cabinets’ – they became our temporary tool storage area, but now Ivan’s mobile and getting into everything so we’ve put most of the tools away in their proper home in the garage.

DSC_0074

DSC_0077

The whole process wasn’t too difficult – if you’ve installed tile, you can probably handle stone veneer. The first step was to prepare the surface for the stone which involved a layer of roofing felt (free from my father-in-law), wire lath (from local stone supplier), and a scratch coat. The roofing felt went onto the drywall easily with the staple gun making sure to overlap the seams. The wire lath was then installed - again using the staple gun and trying to make sure it goes on flat and tight around the corners. We used tin snips to cut it to size and I would recommend leather gloves because the edges are pretty sharp.

The most difficult part was then installing the scratch coat (mortar mix) over the wire lath but once we got the mortar mix to correct consistency my handy hubby was able to muscle it into and over the wire lath with a flat trowel. Oh and I almost forgot, as you can see in the pictures we covered up and taped off the flooring and the fireplace really well before we started with the mortar which I highly recommend because it can turn into a messy job. Once the mortar had set up a little bit we just lightly brushed it with a bristled brush to give it some texture – hence the name scratch coat.

Once all the prep work was done then came the fun part – actually installing the stone. We did a dry layout of a couple courses of stone so we could kinda get familiar with the pattern and what looked good. Then we cut the stone down to size where required with a tile cutter (borrowed from our awesome neighbors). We also had Jens’ cousin helping us out during this part – he was the designated mortar mixer. I was placing the laying out, buttering the back of, and placing the stone, and Jens was cutting the stone. With our three person system the actual stone installation went pretty quick and the pattern is groutless so once the stone was installed we were done (if only we had gotten enough stone to finish it that day…opps)

Next post I’ll update on how our cabinets are coming along which is what we’ve been working on most recently this Jan/Feb (thanks to another awesome neighbor who has borrowed us a heater for our woodshop a.k.a. two car garage).

Monday, February 7, 2011

The Project That Never Ends

In December 2009, Jens and I began a project and ……… it’s not done yet.
In our defense, it is a BIG project and it was interrupted in March 2010 by an important life changing event – the birth of our son, Ivan.

DSC_0346

But, the now we are back at it full steam ahead and we are determined to complete the project in early 2011. Here’s the background story:

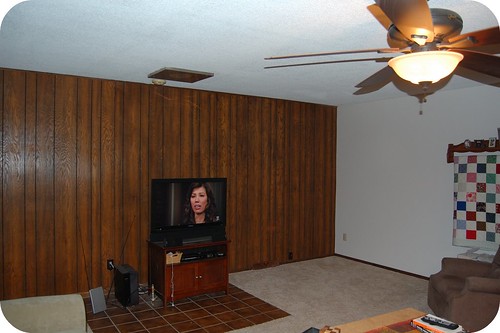
It all started one evening when Jens and I got the itch to start another project while that we had been discussing since buying the house, so before we knew it we had the hammers and crow bars out and we began to tear down the awful faux wood paneling along a big wall in our family room. Here’s what it looked like before that night.

DSC_0094

And here’s the wall once we were done tearing out the paneling. Ahhhh . Goodbye faux wood paneling!

DSC_0095

In case you’re curious, the room used to house a freestanding gas fireplace which vented out the ceiling through the roof which explains the odd looking placement of tile in the middle of the room and the vent cover in the ceiling. When we purchased the house in May 2008 as a foreclosure, all of the appliances, including the fireplace, had been removed but it was otherwise intact. Unfortunately, our family room was freezing during the winter months due to inadequate venting to this room which was a later addition to the house, so we desperately needed another heat source to make this room habitable during a Minnesota winter. Enter a new high efficiency Kozy Heat® Fireplace!

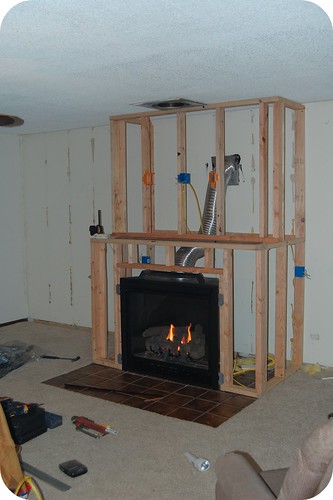
The gas line was already there, but it required a little upgrading since both the dryer and the fireplace came from the same manifold pipe and we needed some additional shut off valves to get things up to code. Once that was complete we framed out a ‘bump-out’ to install the fireplace in according to the clearance dimensions required on the manufacturer’s installation drawings. We also planned on mounting our TV above the fireplace so we ran some electrical boxes with the help of an electrician friend. Here it is all framed out.

DSC_0119

Then came the drywalling, taping, mudding, sanding, more mudding/sanding, and then finally painting. It was starting to come together-but there was a long way to go yet! After the holiday’s we got to work again and made plans for the built-in cabinets which were to flank each side of the fireplace. We used ¾” thick birch veneer plywood to build the carcasses of the cabinets, which Jens was able to whip together using rabbet and dado construction.

...And then in Spring 2010 Ivan was born so everything went on pause for awhile.

We picked the project back up for a little while this past fall and covered the fireplace surround with stone veneer from Boulder Creek. We used a pattern called Western Ledgestak in Appoloosa which I was able to find from Craigslist! (Does anybody else do a little happy dance when they find cheap construction materials on craigslist? I'll be the first to fess up.) It was almost enough for our entire project for just $50 ($300 if we ordered it from our local supplier). We ended up needing to order one additional box, but we still came out way ahead cost wise. And we are really happy with the way it looks and how forgiving it was to work with (i.e. little mistakes aren't noticable due to the natural irregularity of the "stone")

So now we are nearing Ivan's first birthday and it's time to officially get this project completed (especially since he's mobile now and we should probably get our tools out of the family room). Some current status and progress pictures to come shortly.....